Showing posts with label bulkheads. Show all posts

Tuesday, December 27, 2016

December 26 2016 Sailboat Update


December 26 2016 Sailboat Update
One year ago, I had the double layer base put together, and the bulkheads assembled


By request I am adding a picture of the floor insulation and framing. The edge has a 2x4 on edge, then half a 2x4 (ripped lengthwise) as a nailer. there are 2x4's (all 2x material is cedar) under each bulkhead, and under each seam in the plywood. Note that Dave Z does not insulate his floor this way, but I hate cold feet, so made the sandwich bottom.


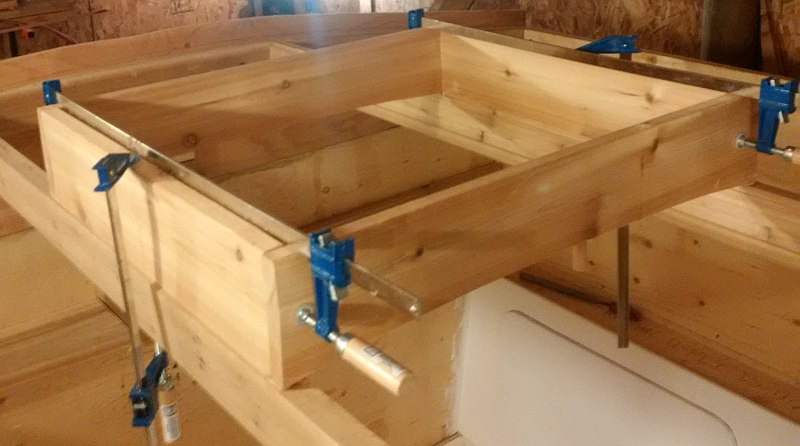
Today, 26 December 2016, I am working on the hatch coamings and assembling the first layer of the main cabin roof.

A jig to control where the router could cut

Here is one of the carlines (I had to look up the correct name) notched into a slot cut into the bulkhead beam. There is a notch cut into the top inside edge, where a sliding screen will go to keep out bugs when the hatch is open. The larger slot below it is to hold a ladder,  which will double as security bars when in the stowed position.

Hatch coaming being glued up on cross beam (carline).

Here are handrails for the interior under construction, as per Dave Z's instruction. These ones are made from cedar sold as deck planks, actual measurements 1" thick by 5 3/8" high


 Handrails installed and being glued up. The top 1x4 will hide the seam in the plywood roof.


I have also been cutting and fitting the plywood that will become the galley floor. Here you can see the two 50 gallon fresh water tanks, and the piece of Form-ply plywood, which is removable to access storage between the tanks.
Here the floor pieces are in place, with the shower pan just in the foreground. The bar fridge will be flipped on it's back and super insulated, directly above where it is sitting now. Before gluing any of these parts, I need to paint under the tanks and shower pan, then cut in the clean out hatches into the tanks, and the matching holes in the plywood to reach those hatches.

Tuesday, April 12, 2016

Pole and leg details


This post is to show some of the construction details on how I ended up


Table leg horizontal

When a large flat space is desired, the table is lowered, the table leg is put in place across to the settee, the settee is pulled out 9", and the two seat backs are placed between the table and settee.This will give an area thirteen feet long and six and a half wide. the cushions will not cover this area completely, so will probably be stacked off to the side. The surface will match the height of the galley sole, so a 24" wide by twenty foot long area is also possible.


top of pole outboard, with barrel bolt detail


Rough cut seat back, still needs rounded edges

Fuzzy picture of pole in place


mortise and tenon

top of pole,inboard


Friday, March 18, 2016

Bunk progress & Oops, March 18, 2016

Progress has been slower than ideal, I have been dealing with my domestic hot water heater, and work for some reason expects me to show up if I want to get paid, but at least I can bank some of the overtime. I cut the two 3/4 inch pieces of plywood that make up the bunk, although I need to decide how to lift them up (do I cut a hand hold, attach a strap or something else?) and trim the edge that will hit the crosspiece when being opened.
   The other detail I discovered was the the top port side of the saloon to bunk bulkhead is 1" farther forward than the rest of the bulkhead. Unfortunately, I have glued enough bits at the bottom and cut the pieces on the bunk side to fit that I will not be able to completely correct this without a lot of work. Luckily, it is a cosmetic problem, not structural, so other than adding time while I adjust cuts in the area to the actual rather than theoretical dimensions, it is not that big a deal.
Also, the cross piece midway up the bunk to front hold bulkhead, is slightly crooked, but will easily do its job of reinforcing where the deck on the front attaches, and strengthening the area where the front tabernacle will attach

Saturday, February 27, 2016

Air vent under bunk routing Feb 27 2016

 Today's progress was putting in supports to hold up the bunk. A while back, I was having an e-mail conversation with Dave Z, about a clever idea I saw in one of the Junk Rig Association magazines, where someone in a northern boat was finding his feet cold while visiting mid winter. His solution was to make a tube of cloth with a small fan at one end, blowing  heat from up by the roof down to the floor. Dave said he was thinking about an air passage from under the dinette, around the bunk, and up beside the wood stove. Here is my interpretation of that, in progress.

Here are the air holes, from either side, penetrating the port side saloon to bunk bulkhead. I am doing a balancing act in their location, wanting a location out of the way of storage, without weakening the bulkhead too much. There is about 10 square inches of  air hole, as well as a limber hole.
A second layer of plywood will be screwed to the outside, so it is removable for annual painting and  cleaning. This will give a 3 inch wide channel, about 8 inches high across the foot of the bunk. It's amazing how much time is consumed trying to figure out these little details. Hopefully everything will work and I will get toasty warm toes when running the wood stove

Monday, February 15, 2016

Stringers and stuff to Feb 15 2016

Stringers, Feb 2016

Previously, I installed 1.5" insulation in the floor, with 2X4 stringers reinforcing the insulation where the bulkheads cross and furniture edges are to be installed. The plywood was cut so that the seams would be hidden under furniture edges. Here is a picture with the insulation dry fit, it was glued in with Gorilla glue  with a layer of 1/2 inch ply on top. The bulkheads were then screwed and glued to the floor, with temporary braces across the top to hold everything square.


This weekends accomplishment was to install stringers made from two 2x6 planks scarfed together for a total length of twenty five feet on one side, and twenty three and change on the other side ( the side door is located at the end of the starboard one).

Starting with a picture of my scarfing jig, which is a 8:1 slope on some scrap plywood, and a piece of plexiglass that replaces the factory base on my router. An ideal plexi base would be a couple of inches wider, as I have to turn the router at an angle so it doesn't slip off the guides.
Completed scarf prior to glue up

I put short pieces of 2X6 on the sides of the bulkheads, to hold the main stringer, and to act as a nailing surface for the inside plywood pieces.


The size and height of the stringer has been chosen so that the joint in the outside plywood layer, the top of the outside reinforcing plywood, the rub/guard rail, the main level of interior furniture and interior plywood all attach to it.


I noticed that Dave Zeiger has added me to his sidebar, thank you Dave! How many other triloboats are under construction out there?